Running XGC
Note: If you are new to XGC or a new platform, our Quickstart may be helpful by providing a functioning example to work from.
Overview
Prepare three files (
input,adios2cfg.xml, andpetsc.rc) and place them in a run directory. Additional data files can be located in a separate directory, which is given by the input Fortran namelist parametersml_input_file_dir=[PATH_TO_INPUT_DIR]. Create a subdirectoryrestart_dirin the run directory for the checkpoint-restart functionality.
Preparation of a run directory
Three files are required in the run directory.
input: Fortran namelist file grouped by categories. More detailsadios2cfg.xml: ADIOS2 configuration file. More detailspetsc.rc: PETSc resource file. More details
Additional files are located in the directory specified by the input parameter sml_input_file_dir:
.eqdfile: Magnetic equilibrium file generated from EFIT geqdsk file. Toroidal and poloidal magnetic field (I=R*Bt and psi=poloidal flux / 2pi), magnetic axis and X-point location are stored. This file can be generated by utils/efit2eqd from EFIT geqdsk file.Mesh files: Triangle mesh files (
*.nodeand*.ele). The file formats are described here. To generate the mesh files for XGC, you can use RPI’s XGC mesh generator. You also need a*.flx.aiffile, which describes flux surfaces information. RPI’s XGC mesh code generates the.flx.aiffile together with.nodeand.elefiles.Profile files: Initial equilibrium profiles (density and temperature) can be specified by an analytic formula or read from text files. The file format is simple text (ascii) with the number of datapoints, two-column data for normalized poloidal flux and profile, and an end flag (-1). The normalized poloidal flux is unity at the magnetic separatrix and zero on the magnetic axis. The units of the profiles are \(m^{-3}\) for density and eV for temperature. When toroidal flow (toroidal angular velocity) profile is required, its unit is rad/s. Below is a sample Fortran code that reads the profile data in the expected format.
read(funit,*) num
allocate(psi(num),var(num))
do i=1, num
   read(funit,*) psi(i),var(i)
enddo
read(funit,*) flag
if(flag/=-1) then
   print *, 'error in profile ftn init : invalid number of data or ending flag -1 is not set correctly', flag, ftn%filename
   stop
endif
For the checkpoint-restart functionality, a subdirectory called restart_dir must be present in your run directory. You can create it manually or have your execution script take care of this.
ADIOS2 configuration
XGC’s outputs are written with ADIOS2 and can be configured and controlled by ADIOS2’s XML config file (adios2cfg.xml). A default ADIOS2 config file is provided in the repository (quickstart/inputs/adios2cfg.xml). For better performance and tuning, users can update the ADIOS2 config file before launching a run.
Each XGC output has a unique ADIOS I/O name (e.g., restart, restartf0, f3d, etc.) and users can specify ADIOS2 engine and its parameters. An example is shown here:
<?xml version="1.0"?>
<adios-config>
    <io name="restart">
        <engine type="BP4">
            <parameter key="Profile" value="Off"/>
        </engine>
    </io>
</adios-config>
In the ADIOS2 config file, users can specify the following parameters for each io block:
I/O name: the ADIOS2 name of XGC’s output (e.g.,
restart)Engine name: the name of the ADIOS2 I/O engine. ADIOS2 provides various engines for file outputs, data streaming, etc. Examples are
BP4(native ADIOS file format),HDF5, andSST(for in memory data exchange and streaming).Engine parameters: ADIOS2 provides a wide range of options to control the engine. Users can provide the key-value pairs of options in the XML. The full list of engines and options can be found in ADIOS2 user manual.
Here we list a few commonly used parameters for BP4 engine:
Profile: Turn ON or OFF the writing of ADIOS profiling information.BurstBufferPath: Redirect output file to another location. This feature can be used on machines that have local NVMe/SSDs. On Summit at OLCF, use “/mnt/bb/<username>” for the path where <username> is your user account name. Temporary files on the accelerated storage will be automatically deleted after the application closes the output and ADIOS drains all data to the file system, unless draining is turned off by BurstBufferDrain parameter.BurstBufferDrain: Turn ON or OFF the burst buffer draining.NumAggregators: Control the number of sub-files to be written. It ranges between 1 and the number of writing MPI processes. As of ADIOS2 version 2.7 release (Jan 2021), ADIOS2 set the default aggregation mode to be 1 sub-file per compute node (from one sub-file per process). It is recommended not to specify NumAggregators param anymore. The following is for fine tuning only. Choosing the optimum number of aggregators is not straightforward. It depends on the degree of parallelization and the filesystem specification. But, the rule of thumb is to use 1, 2, or 4 aggregators per node when running a large-scale simulation (e.g., more than 256 nodes on Summit). For example, if you are trying to run a 1024 Summit node job using 6 MPI processes per node, try to setNumAggregatorsas 1024 or 2048.
PETSc configuration
XGC uses the PETSc library for solving matrix equations of Poisson and Ampere’s equations. For more details, see the PETSc homepage.
An example petsc.rc configuration file is found in the quickstart/inputs source subdirectory.
Examples of batch scripts
Different clusters will generally require a different batch script to run the simulation. Example scripts for our target platforms are found inside the repository in the directory quickstart/job_scripts, and are reproduced below.
Note that these example job scripts call three other scripts: modules.sh, which is specific to the platform and found in quickstart/modules_and_env under the name of the platform; and two convenient scripts print_jobinfo.sh and setup_rundir.sh, which can both be found in quickstart/job_scripts.
Aurora
#!/bin/bash
#PBS -l nodes=2
#PBS -q prod
#PBS -W run_count=17
#PBS -j oe
#PBS -k doe
#PBS -A XGC_aesp_CNDA
#PBS -l walltime=00:30:00
#PBS -N myCustomJobName

export XGC_NNODES=`wc -l < $PBS_NODEFILE`
export XGC_NRANKS_PER_NODE=12
Frontier
#!/bin/bash
#SBATCH -A phy122
#SBATCH -J xgc_kin
#SBATCH -t 01:00:00
#SBATCH -N 2
#SBATCH -o %x_%j.out
#SBATCH -e %x_%j.err
#SBATCH --threads-per-core=2

export XGC_NNODES=${SLURM_JOB_NUM_NODES}
export XGC_NRANKS_PER_NODE=8
Perlmutter (GPU)
#!/bin/bash
#SBATCH -A m499_g
#SBATCH -C gpu
#SBATCH -q regular
#SBATCH -t 1:00:00
#SBATCH -N 2
#SBATCH --job-name=JOB_NAME

export XGC_NNODES=${SLURM_JOB_NUM_NODES}
export XGC_NRANKS_PER_NODE=4
Perlmutter (CPU)
#!/bin/bash
#SBATCH -A m499
#SBATCH -C cpu
#SBATCH -q regular
#SBATCH -t 1:00:00
#SBATCH -N 2
#SBATCH --job-name=JOB_NAME

export XGC_NNODES=${SLURM_JOB_NUM_NODES}
export XGC_NRANKS_PER_NODE=32
Polaris
#!/bin/bash
#PBS -l nodes=16
#PBS -l filesystems=home:eagle
#PBS -l walltime=01:00:00
#PBS -A TokamakITER
#PBS -N xgcBench32
#PBS -j oe
#PBS -k doe
#PBS -q prod

# This is important: go to working directory
cd ${PBS_O_WORKDIR}

export XGC_NNODES=`wc -l < $PBS_NODEFILE`
NDEPTH=16         # Number of hardware threads per rank, spacing between MPI ranks on a node

# Create set_affinity_gpu_polaris.sh file
echo '#!/bin/bash
num_gpus=4
gpu=$((${PMI_LOCAL_RANK} % ${num_gpus}))
export CUDA_VISIBLE_DEVICES=$gpu
echo “RANK= ${PMI_RANK} LOCAL_RANK= ${PMI_LOCAL_RANK} gpu= ${gpu}”
exec "$@"' > set_affinity_gpu_polaris.sh
chmod +x set_affinity_gpu_polaris.sh

export XGC_NRANKS_PER_NODE=4
Stellar
Stellar is a CPU cluster available to the Princeton University community upon approval. See https://researchcomputing.princeton.edu/systems/stellar for more details.
#!/bin/bash
#SBATCH -A pppl
#SBATCH --nodes=2
#SBATCH --ntasks-per-node=96
#SBATCH --ntasks-per-socket=24
#SBATCH --cpus-per-task=1
#SBATCH -t 00:30:00
#SBATCH --qos=stellar-debug
#SBATCH --mail-type=BEGIN,END,FAIL

source /projects/XGC/STELLAR/Software/bin/set_up_xgc.stellar

export OMP_PROC_BIND=false
export OMP_NUM_THREADS=1

export n_mpi_ranks_per_node=96
export n_mpi_ranks=$((${SLURM_JOB_NUM_NODES} * ${n_mpi_ranks_per_node}))
export XGC_EXEC=${HOME}/path_to_executable

echo 'Number of nodes: '                  ${SLURM_JOB_NUM_NODES}
echo 'MPI ranks (total): '                $n_mpi_ranks
echo 'MPI ranks per node: '               $n_mpi_ranks_per_node
echo 'Number of OMP threads: '            ${OMP_NUM_THREADS}
echo 'XGC executable: '                   ${XGC_EXEC}

OUTFILE=xgc_${SLURM_JOB_ID}.log
srun ${XGC_EXEC} &> ${OUTFILE}
Submit the job using the following submission command:
sbatch batch.sh
XGC Examples
XGC examples (https://github.com/PrincetonUniversity/XGC-Examples.git) are maintained separately from the code repository to avoid large data files in the code repository.
For a list of examples, click here.
XGC performance
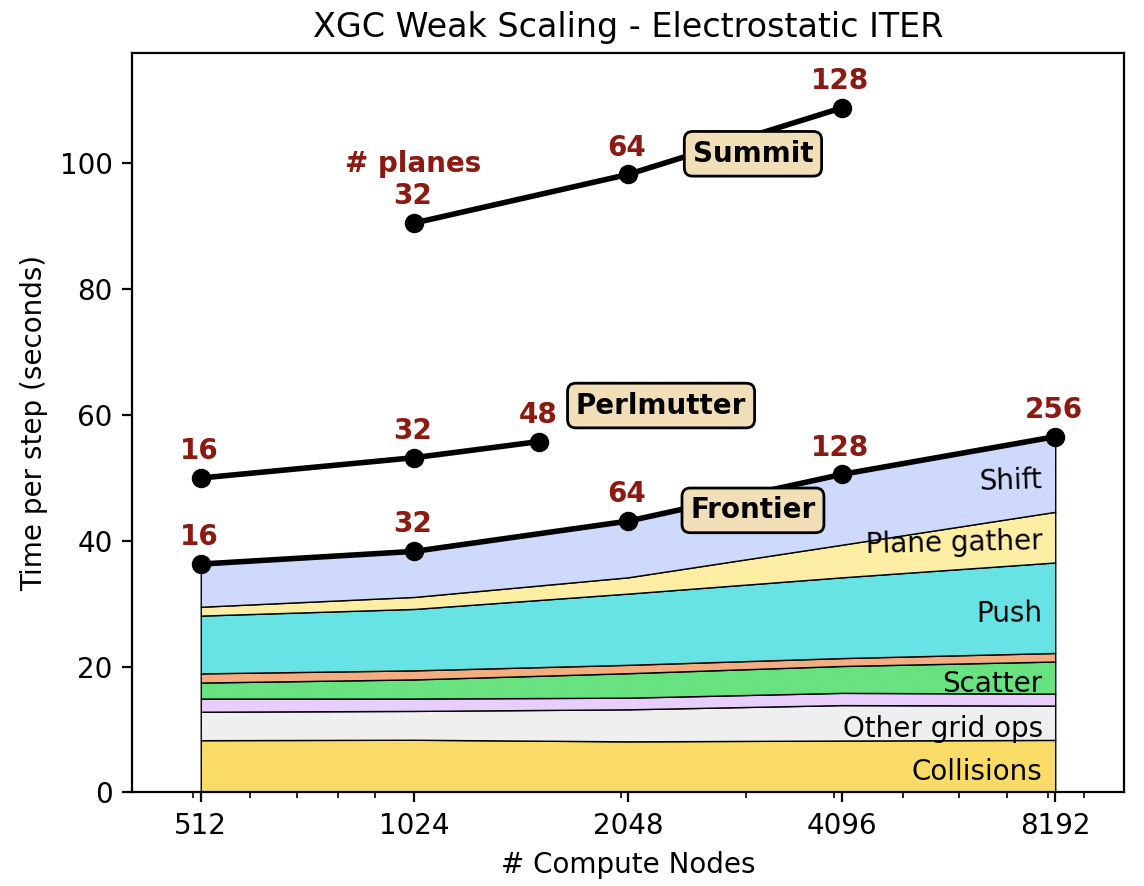
XGC weak scaling of electrostatic ITER simulation using Frontier, Perlmutter(GPU), and Summit. XGC shows good weak scaling up to the full GPU nodes. The scaling study has been done by Aaron Scheinberg at Jubiliee Development and Paul Lin at Lawrence Berkeley National Laboratory.
Running XGC-S
Three folders are required in the run directory:
equilibriumfolder: contains a subfolder that incluces equilibrium magnetic field and mesh files..datfile: set simulation domain \(R_\min,R_\max,Z_\min,Z_\max\) on each plane. Also set number of grid points (mr,mz,mphi) in \((R,Z,\varphi)\) for bicubic interpolation and stellarator turn number kturn..fluxfile: 3D bicubic interpolation coefficients for the radial label \(\psi\), which is normalized and set to one at an arbitrary flux surface..mag1file: 3D bicubic interpolation coefficients for \(B_R\)..mag2file: 3D bicubic interpolation coefficients for \(B_\varphi\)..mag3file: 3D bicubic interpolation coefficients for \(B_Z\)..nodeand.elefiles: same mesh files for XGC1..gridfile: number of flux surfaces and number of nodes on each surface, similar to.flx.aiffile for XGC1..iotafile: read but not used.Except for
.gridand.iota, all other files are defined on 2*mp+1 different planes, namely, 2*mp+1 different files.
profilefolder: contains a profile data file, which gives \(n_i, \partial_\psi n_i, T_i, \partial_\psi T_i\) in the region \(\psi\in[0,1]\) where \(\psi\) is the normalized radial label consistent with that defined in the.datand.fluxfiles.A third folder with arbitrary name: actual run directory containing batch script (including path to
xgc-s),input,petsc.rc. Also needadios2cfg.xmlif ADIOS2 is used.
Examples of batch scripts on Perlmutter CPU nodes and Stellar can be found above. Note that currently xgc-s does not fully support OpenMP and export OMP_NUM_THREADS=1 should be used in the batch scripts.