Feature branch workflow inside a fork
Code development inside a fork shall be organized in a feature branch workflow. The “master” branch in a fork is meant to be a copy of “master” in the parent repo at all times. The fork owner is responsible for keeping “master” in the fork synchronized with “master” in the parent repository. If you configured the remote “upstream” as explained above, you can use the following commands:
> git fetch upstream
> git checkout master
> git merge upstream/master
> git push origin master
If “upstream” is not set in your working copy, you can do this instead:
      > git checkout master
      > git pull https://[username]@github.com/PrincetonUniversity/XGC-Devel.git master
      > git push origin master

This is supposed to prevent the development of conflicting source code in different projects. Only the fork owner is supposed to write to the “master” branch of the fork and only to git-pull from “master” in the parent repo. The fork owner shall, therefore, create a rule that restricts write access to the “master” branch in the fork to the fork owner. This can be done in the “Settings” tab under “Branches” (Fig. 7).
Before starting to modify source code, a new branch that is based on the “master” branch (or a different branch, depending on the situation) needs to be created. A new branch can be created either online with the GitHub GUI (Fig. 8) or on the command line.
To create a new branch with the GitHub GUI, open the branch dropdown menu and switch to the branch from which you want to start. Then open the dropdown menu again and enter a name for the new branch. If the name you entered does not exist yet, a box “Create branch: … from …” appears. Click on it to create the new branch.
For creating a new branch from the command line in your local working copy, use git-checkout:
> git checkout –b [username]/[new feature] [base branch]
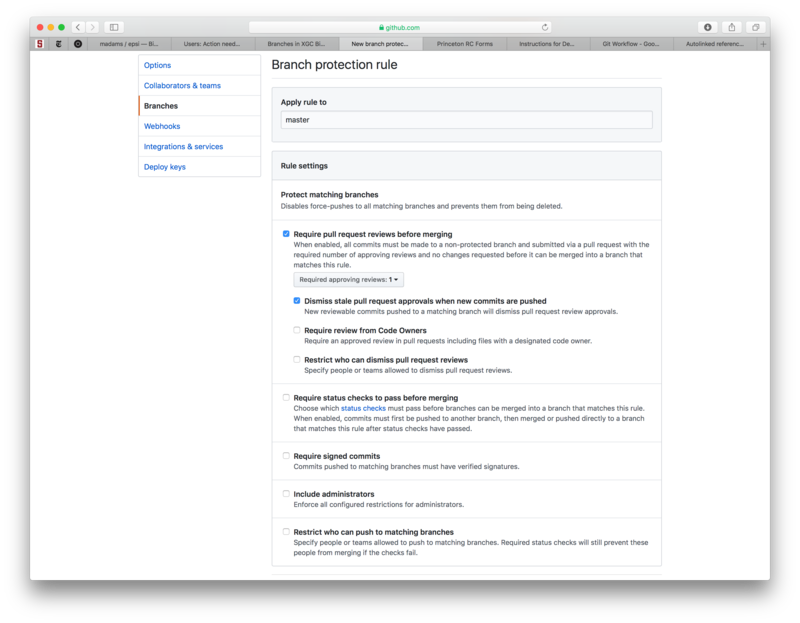
Create a branch protection rule for the branch “master” to prevent direct pushing to “master”. With this rule, pull requests are required for merging changes into master.
This creates a new branch named [username]/[branch name] based on the branch [base branch]. Users are expected to follow this naming convention so that every branch can readily be associated with the developer who created it and is responsible for it. You can now start to work on your new branch (if you created your new branch on GitHub, you have to git-pull it to your working copy first). When you are done with your work and ready to commit it, use git-commit:
git commit –am 'a message explaining what you did'
Please include a detailed commit message with every commit, so that others can understand what you did. The commit message can run over multiple lines by pressing enter. The commit is only executed once you enter the closing single quote of the commit message and hit enter.
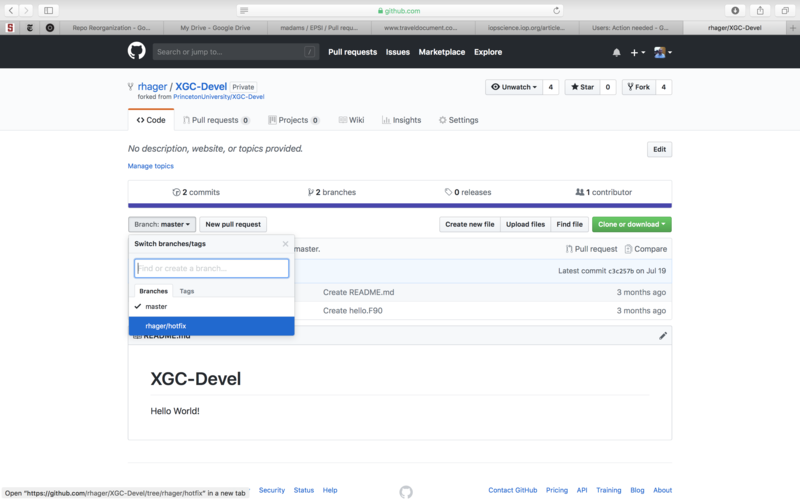
Creating a new branch with the GitHub GUI.
To synchronize your branch in your local working copy with your branch in the remote repo (on github.com), run a git-pull first to fetch all changes someone else may have committed to this branch in the meantime:
git pull origin [username/branch name]
Then push to the upstream repo:
git push origin [username/branch name]
Here, the origin refers to the remote repository from which your working copy was cloned. In order to prevent unintended mishaps, always specify the branch name when pushing or pulling.